Bass Abyss Level Editor
The Bass Abyss Level Editor is a FLA file used to create new maps for Bass Abyss.
FLA is a binary format used by Macromedia Flash Professional. The Bass Abyss maps are text documents in XML format.
Requeriments
Macromedia Flash 8 Professional or better, with support for ActionScript 2.0.
Download
The level editor is distributed as a zipped FLA file.
Bass Abyss Level Editor 2.0 beta.zip
Bass Abyss Level Editor v1.0.2.zip
This documentation is based on the 1.x editor. The 2.x editor is a work in progress, but this documentation still applies.
The screen captures shown in this tutorial are based on Macromedia Flash 8 Professional.
Editor Overview - Publishing a Map
Let's publish a sample map before trying anything more complex.
Unzip the contents of the zip file. Use Flash Professional to open the extracted FLA file.
Save the opened file with a new name. To do this choose File -> Save as ... and save it with a new name, e.g. my_map.fla.
Now choose Control -> Test Movie, or Ctrl+Enter for short. The movie will be published.
Close the test window.
Press F2 to show the Output Window. The text in that window is the XML code of the map. Right click on it and select Copy. This will copy all the data to the clipboard.
(Optional) If you pasted and formatted the code in some text editor like Visual Studio Code, the code would look similar to this.
<map bg="fondo01" height="416" music="Level1" width="768">
	<player scale="100" x="160" y="336"/>
	<disks min="1" total="3"/>
	<tiles>
		<tile id="30" x="50" y="384"/>
		<tile id="30" x="146" y="384"/>
		...
	</tiles>
	<enemies/>
</map>
For reference, you can see the expected output here.
Now let's load this code into Bass Abyss.
Playing a Map
Start Bass Abyss. At the main menu, select the Custom Level option.
Select the Paste Code tab at the menu bar. Paste the XML code in the text area provided: either with Control+V or right-click inside the text area and select Paste from the context menu.
Press play!
If the map loaded correctly, you will see the Character Selection screen. If you get an error, make sure you copied all the text of the previous step and try again.
Once you select a character, the level will start immediately.
The level editor describes a very simple map. Yet, it contains the required components to create a functional level. You can:
- Walk to the exit
- Pick up disks
- Use a checkpoint
- Use platforms
- Die from hazards
- Respawn from checkpoint
Creating a new map is just a matter of making the sample one longer and more challenging.
In conclusion for this section, the Bass Abyss level editor is a FLA file that is both, level editor and a map definition. To create new maps, you save the FLA file with a new name and work on that copy. When done, you publish the XML code and paste it in Bass Abyss to play it.
Now that you're familiar with the general workflow, let's examine the options available to create more complex maps.
Editing a map
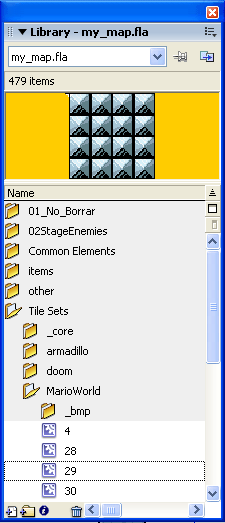
A Bass Abyss map is made of tiles. I use Movie Clip symbols to position the tiles in the map. All the tiles available for authoring are stored in the Library.
If not visible, hit Ctrl-L to show the Library widget. I've organized the tiles in a folder structure that seemed logical to me. Feel free to change this layout in any way you want.
Before I give you more details let's try a quick example. At the library open the "Tile Sets" folder, then open the "MarioWorld" folder. Select the item named 29. You should see a preview of this tile at the top of the Library widget.
Drag this symbol to the stage to place it in the map. Publish and test the map. You should find this tile in the same location you placed it in the editor.
Now some details about the symbols in the library. Not everything is usable as a tile. For example, don't use anything inside the top-level folder called "01_No_Borrar" or anything in any folder called _bmp, _core or _src. Those folders contain support assets for the actual tiles. If you placed them on the stage, they wouldn't be picked up by the script that generates the map, and thus they would not show up during gameplay. A good rule of thumb is: if the name of the library symbol is not a number, it is not usable by the editor.
Once you place a tile in the map, don't rotate, resize or flip them. This information will not be transferred to the map data. Only change their location in the stage. If you need a rotated tile, there's probably rotated symbol the in the library with another name. You just need to look for it.
Starting Point
You can make the map as big as you want, but where does the character start? This is indicated by a special symbol: The cyan rectangle with a white arrow inside. If you delete it by accident, you can find it in the library in the folder "01_No_Borrar" as "Character registration Point".
![]()
This is the only tile you can flip horizontally, because this information tells the engine at which direction the character should be facing at the start: left or right. To set this just select the tile and then Modify -> Transform -> Flip Horizontal.
Special Tiles / Objects
The tiles at the "Tile Sets" folder are mostly for static tiles that will do nothing other than act as ground, ceiling or walls. However, there are some symbols with special meaning during gameplay.
The Disks
The main goal of the game is to collect the required disks to unlock the exit. They are located at the "items" folder, symbol 26.
Extra Life
The hearts that give an extra life to the player are located at the "items" folder, symbol 79.
Ammo
The ammo items are self explanatory. You can find them in the same "items" folder.
Jumper
This is my favorite one. It's located in the folder Common Elements, symbol 56.
Exit Lights
Use these lights to signal the exit. They are red when you don't have the required disks and turn green when you have them. They are located at the Common Elements -> Exit Alerts folder.
Exit marker
The exit and level completion is actually activated when the player walks on these invisible movie clips. In the editor you'll see them as green transparent squares. You can find it at the Common Elements -> Exit HotArea folder. I use to place several ones to fill large exit gaps.
Hazards
The tiles that automatically kill the player are at the Common Elements -> Hazards folder. There are other hazards in some of the "Tile Sets" folders as well. They'll be self explanatory when you find one.
Platforms
You may use the symbols 9, 20 and 43 at the Common Elements->Platforms folder, but if you want an endless stream of platforms, you shuold use Generators, explained in the next section.
Symbols 151 and 153 are safe to use. These are the tiles that stay idle until the player steps on them, and then carry the player downwards the map.
Generators
These are special scene markers. They're not visible during game time. They are responsible for the generation of a stream of platforms. They are located in the Common Elements -> Platform folder.
Platforms will be generated at the point you place a generator. Experiment with them to see which type of platforms are generated.
Wind
They push the flying platforms horizontally. Common Elements -> Viento.
Those are the most important Tiles and Objects I can think of at the moment. If some tile has not been documented here, just place it in the map and see what happens.
Checkpoint
It is located in the Common Elements -> Checkpoint folder. The purpose of this tile is to let the player resume a level from this point after losing a life. You can place as many as you want.
A good place to put them is before any tricky section, specially on long levels. After a lot of progress, a cheap death and forcing the player to start over from the beginning of the map could be too punishing.
Enemies
They are located at the folder "02StageEnemies". As usual, just drag them to the stage at the position you want them to show up.
Other map attributes
Having learned how to place stage items in the map, it is time to discuss some special map attributes such as the background image or the music.
All this information is conveyed by that big box that says Level Information.
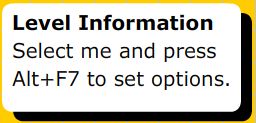
First you must select it, then hit Alt+F7 to open the Component Inspector.

Ignoring that fancy name, and the other scary tabs, everything you need to change is in the Parameters tab.
Click on the Value next to the setting name you want to change.
Background Image: You can select any of the images I've used for the existing Bass Abyss levels. The editor is unable to preview any changes you make here. This is because the background images are not stored in the editor, but in the server where Bass Abyss is hosted.
I suggest you to experiment with different values, publish the map and test it to see what background belongs to what name.
Background Music: This is the same situation as with the Background Image. The editor will just add some music code to the map output You won't hear anything unless you publish and test the map. The music files only exist in the server. Only tunes from existing Bass Abyss levels are available at the moment.
Required disks: Here you decide how many disks the player must find before the exits are activated. By default only one disk is required.
Can I use my own tiles, artwork, enemies or music?
Not at the moment.
Distributing your maps
Once you're finished building your map, everything you have to do is save the map data as a text file and publish it anywhere you want.
It is up to you if you also want to distribute the FLA file. Others will be able to edit your map that way.
Sample maps in FLA format
Here are some of the previous Bass Abyss maps in the FLA editor format for you to examine. These files are old and the folder structure doesn't match the one described here, but you'll get the idea. Feel free to modify them.
Changelog:
- 2021-08-08: Notes on Ruffle.
- Added plenty of Mega Man X3 enemies.
- 1.0.2 New songs: MM8_vsBass. MM8_WilyStage2. MM8_WilyStage3. Winston_TechedUpTreat.
- 1.0.1 Added Checkpoint tile and X1Launcher enemy
- 1.0 Initial release